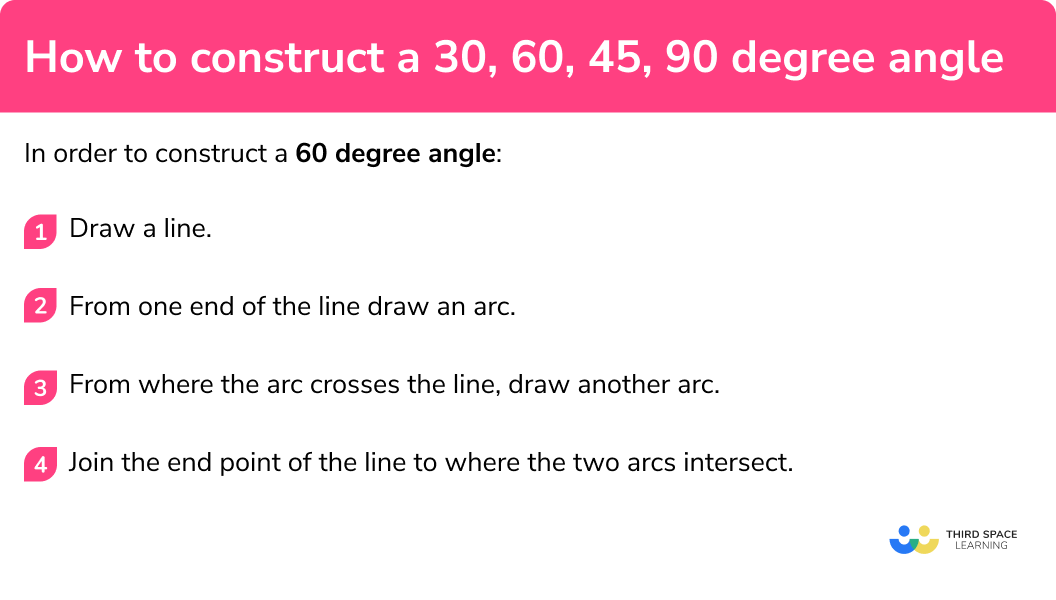
Unlock the Secret to Perfect Geometry: How to Construct a 60 Degree Angle in No Time!
Unlock the Secret to Perfect Geometry: How to Construct a 60 Degree Angle in No Time!
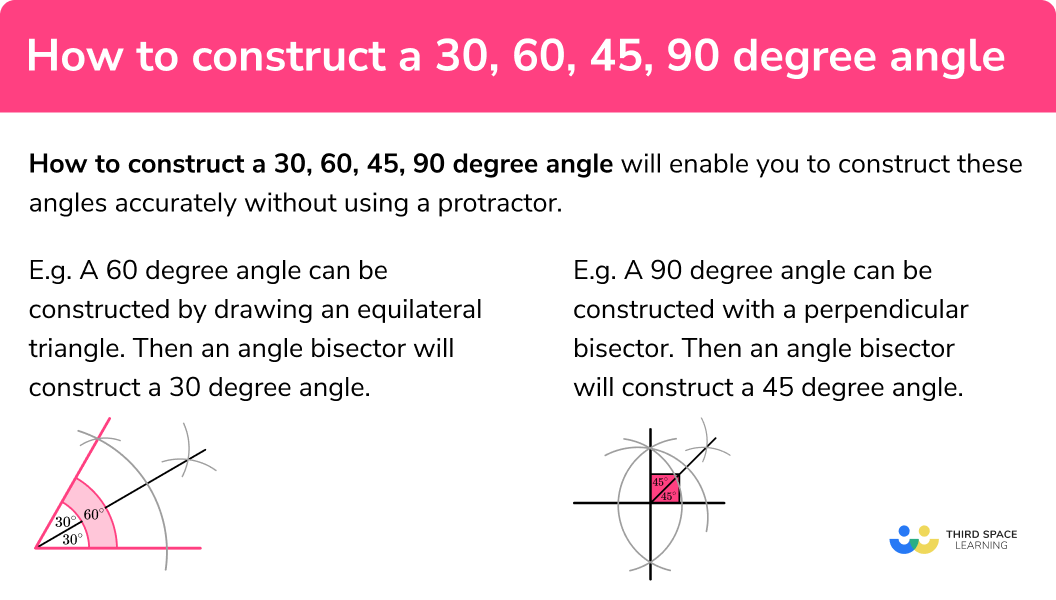
In everyday life, precise geometry is crucial for various applications, from construction and carpentry to crafting and art. A specific angle that stands out in this context is the 60-degree angle, which is omnipresent in many architectural and design aspects. Constructing a perfect 60-degree angle can be a challenge for some, but with the right approach, it's certainly achievable. In this article, we'll guide you through a simple, step-by-step approach to constructing a perfect 60-degree angle using basic tools and techniques.
**Understanding the Importance of 60-Degree Angles**
The 60-degree angle has numerous applications in various fields. For instance, it's an essential component in the construction of domes and other curved structures. In carpentry, it's often used in the creation of precise joints and mortise and tenon designs. Moreover, in sports – particularly in golf and shooting – the 60-degree angle of the club or gun is critical for achieving optimal trajectory and accuracy.
As Dr. Eric Johnson, a renowned architect and professor at a leading university, explains, "A precision angle like the 60 degree plays a vital role in shaping the spatial intent and visual impact of a building or design. Its importance lies in its mathematical simplicity, yet its practical applications are vast." The simplicity and versatility of this angle make it a fundamental aspect in various aspects, making it worth exploring its construction techniques.
**Preparation is Key: Essential Tools and Materials**
To construct a perfect 60-degree angle, you'll require some basic tools and materials. The following are the most commonly used:
* A straightedge or ruler
* A protractor or angle measurer
* A pencil or drawing tool
* A compass or other circular-measuring tool (optional)
* A measurement table or spreadsheet (optional)
These tools will help you measure and mark precise angles. Familiarize yourself with their usage to avoid mistakes during the construction process.
**Step 1: Establish the Base Line**
Creating a base line involves drawing an initial line that will serve as the foundation for your 60-degree angle. To achieve this:
1. Place a straightedge on a flat surface.
2. Mark a point on the straightedge for reference.
3. From this point, using a pencil, draw a perpendicular line onto a different surface or a separate sheet.
4. This initial line marks the base for your angle's construction.
**Step 2: Create the First Reference Line**
The second step involves creating a reference line that will help you create the 60-degree angle:
1. Locate the exact middle point of the base line.
2. Measure or draw a line, marking it 60 degrees from the middle of the base line (alternatively, you can use astrygnet method or protractor for 60-degree line).
3. Using your straightedge, ensure both marks are parallel to your base line.
4. Once this reference line is set, your structure will obtain the desired 60-degree bent.
**Step 3: Develop the 30-degree Extension**
In relationship with the opposite ending point of the 60 degree mark. This precise method guide, Divide this distance by half upon completion to Re check for consistency from initial scale measure. Profound patience allows for good expertise to handle each reoccurring disagree plan as compared precise results.

Related Post

Unlocking the Future of Food Retail: How Premier Services Commissary Deposit is Revolutionizing the Industry

Unveiling the Magic of Wbwl: A Deep Dive into the World of Harry Potter Fanfiction

Is Damon Wayans Married - The Elusive Truth Behind the Beloved Actor's Personal Life

Mark Levin's Youthful Years: A Photographic Journey Through Time


